Transforming Memories: My Journey to Convert Negatives into Stunning Digital Images
As a photography enthusiast, I’ve always been captivated by the stories hidden within the frames of old negatives. Each strip of film holds a world of memories, waiting to be unearthed and shared. With the advent of digital technology, the process of converting negatives into digital images has become a bridge connecting the nostalgia of the past with the possibilities of the present. It’s not just about preserving history; it’s about breathing new life into cherished moments that might otherwise fade away. In this article, I’ll explore the fascinating journey of transforming those tangible pieces of film into vibrant digital files, unlocking the potential to relive and share our visual narratives like never before. Join me as we delve into the methods, benefits, and emotional resonance of this rewarding process!
I Tried Converting Negatives Into Digital Images Myself and Here Are My Honest Recommendations

KODAK Slide N SCAN Film & Slide Scanner Digitizer with 5” LCD Screen, Quickly Convert Negatives & Slides to Digital 22MP JPEG Photos, Compatible with 135, 126 and 110 Film & Slides
ClearClick QuickConvert 2.0 Photo, Slide, and Negative Scanner – Scan 4×6 Photos & 35mm, 110, 126 Film – No Computer Required – 22 MegaPixels

DIGITNOW! 135 Film Negative Scanner High Resolution Slide Viewer,Convert 35mm Film &Slide to Digital JPEG Save into SD Card, with Slide Mounts Feeder No Computer/Software Required
Magnasonic All-in-One 24MP Film Scanner with Large 5″ Display & HDMI, Converts 35mm/126/110/Super 8 Film & 135/126/110 Slides into Digital Photos, Built-in Memory (FS71)
1. KODAK Slide N SCAN Film & Slide Scanner Digitizer with 5” LCD Screen, Quickly Convert Negatives & Slides to Digital 22MP JPEG Photos, Compatible with 135, 126 and 110 Film & Slides
As someone who cherishes memories captured in photographs, I can’t help but feel excited about the KODAK Slide N SCAN Film & Slide Scanner Digitizer. This remarkable product serves as a bridge between the past and present, allowing me to preserve my cherished moments in a digital format that is easily shareable and accessible. In an age where digital media reigns supreme, this scanner empowers me to convert my old negatives and slides into stunning 22MP JPEG photos, ensuring that my family’s history is not lost but rather brought back to life.
One of the standout features of this scanner is its ability to save old photo memories effortlessly. With compatibility for 135, 110, and 126mm negatives and slides, the KODAK Slide N SCAN is a versatile tool that caters to various film formats. This means I can dig through my attic or storage boxes and retrieve those dusty old slides, knowing that I have the means to convert them into high-quality digital files. The thought of being able to view, edit, and store these memories directly onto an SD card (though it’s worth noting that the card is not included) gives me a sense of empowerment and excitement.
The 5” LCD display with gallery mode adds another layer of convenience and enjoyment to the scanning process. The large, crystal-clear screen allows for instant previewing and editing, which is incredibly beneficial when I want to share these memories with friends and family. Not to mention, the ability to use this scanner as an elegant digital picture frame in my home or office is a delightful bonus. It effortlessly blends into my home décor while showcasing my most treasured memories, transforming my living space into a gallery of nostalgia.
One of my favorite features is the convenient easy-load film inserts that make scanning a breeze. The quick-feeding tray technology allows for continuous loading, meaning I can scan multiple slides and negatives in a short amount of time. This is particularly appealing when I have a large collection to digitize. The inclusion of various adapters for different film types and a cleaning brush to keep everything in top shape shows that KODAK has thought of everything to make this process as smooth as possible.
Editing photos is often a daunting task, but the KODAK Slide N SCAN simplifies this with its advanced capture software. With just a single touch of the ‘Scan’ button, I can enhance, resize, and convert photos without having to navigate through complex screens or settings. The easy options available allow me to choose the film type, adjust color and brightness, and even assign date and time stamps. This means I can personalize each photo to my liking and create a digital archive that truly reflects my memories.
Moreover, the chic design of this scanner makes it a stylish addition to my tech collection. Its compatibility with SD or SDHC cards up to 32GB and connection capability to any Type-C USB-enabled computer ensures that I won’t face any challenges when integrating it into my current digital setup. I appreciate how KODAK has managed to combine functionality with aesthetics in a product that is both modern and sophisticated.
I wholeheartedly recommend the KODAK Slide N SCAN Film & Slide Scanner Digitizer to anyone looking to preserve their photographic memories. This scanner not only simplifies the process of digitizing old slides and negatives but also enhances the experience with its user-friendly features and stunning display. If you’re like me and value the memories captured in photographs, investing in this scanner will undoubtedly provide you with a means to preserve and share those moments for years to come. Don’t wait—bring your memories into the digital age today!
Feature Description Memory Preservation Convert old color and B&W negatives and slides to 22MP JPEG files. Compatibility Works with 135, 110, and 126mm film formats. Display 5” LCD screen with gallery mode for previewing and editing photos. Easy-Load Film Inserts Quick-feeding tray technology for fast and simple scanning. Editing Features Advanced software to enhance, resize, and convert photos with a single touch. Design Stylish and chic design that fits seamlessly with home décor.
Get It From Amazon Now: Check Price on Amazon & FREE Returns
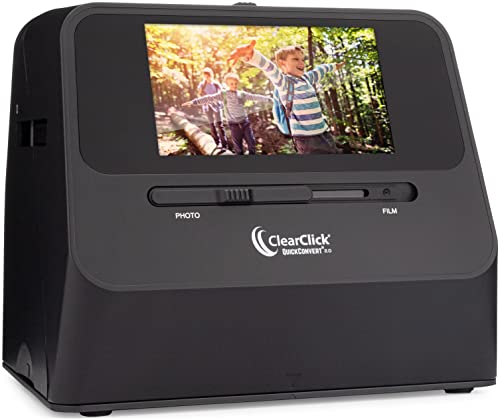
2. ClearClick QuickConvert 2.0 Photo, Slide, and Negative Scanner – Scan 4×6 Photos & 35mm, 110, 126 Film – No Computer Required – 22 MegaPixels
As someone who values preserving memories, I found the ClearClick QuickConvert 2.0 Photo, Slide, and Negative Scanner to be an exceptional tool for digitizing old photographs and film. This product is designed for those who want to effortlessly convert their cherished physical memories into digital formats without the need for complex technology or cumbersome software. With its user-friendly features, it can transform the daunting task of scanning into an enjoyable, quick, and efficient process.
The scanner operates at a remarkable speed, taking only 2-3 seconds to scan each photo, slide, or negative. This is particularly impressive given that it can handle 4×6 photos and smaller formats. The fact that it doesn’t require a computer or any drivers means I can start scanning right out of the box—there’s no hassle of installation or setup. Just turn it on, press a button, and I’m ready to digitize my memories! For those of us who may not be tech-savvy, this feature is a significant advantage.
One of the standout features is its scanning quality. With a resolution of 14 MegaPixels (and 22 MegaPixels interpolated), I can trust that my digital files will capture the essence and detail of the originals. The scanner saves images as JPEG files directly to an SD memory card, making it easy to store and transfer my memories to other devices or share them with friends and family. The built-in rechargeable battery allows for cord-free scanning, enabling me to move around comfortably while scanning, which is a major plus when working through a stack of old photographs.
The 5-inch instant preview LCD screen is another thoughtful addition. It allows me to see how the scans will look before saving them, ensuring I get the perfect image every time. Additionally, the ability to scan photos without removing them from albums or mounts is a huge time-saver, especially for those of us who have meticulously organized our collections. However, it’s worth noting that this scanner does not support 5×7 photos, so I would need to consider that if I have larger prints.
Investing in the ClearClick QuickConvert 2.0 Scanner is not just about acquiring a gadget; it’s about safeguarding my memories for the future. The two-year warranty and tech support from ClearClick, a small business based in the USA, add an extra layer of assurance that I am making a reliable purchase. Knowing that I have support readily available gives me confidence in my decision.
if you are looking for a practical and efficient way to digitize your old photos, slides, and negatives, the ClearClick QuickConvert 2.0 is an excellent choice. It combines speed, quality, and ease of use, making it suitable for anyone—whether you are a tech novice or an experienced user. I genuinely believe that this scanner will make a significant difference in how I preserve my memories. So why wait? Start converting your precious moments into digital keepsakes today!
Feature Description Scanning Speed 2-3 seconds per photo, slide, or negative Supported Formats 4×6 photos and smaller; does not support 5×7 photos Scanning Quality 14 MegaPixels (22 MegaPixels interpolated) File Format JPEG saved on SD memory card Power Source Built-in rechargeable battery for cord-free operation Preview Screen 5-inch instant preview LCD screen Warranty 2-year warranty and tech support
Get It From Amazon Now: Check Price on Amazon & FREE Returns
3. DIGITNOW! 135 Film Negative Scanner High Resolution Slide Viewer,Convert 35mm Film &Slide to Digital JPEG Save into SD Card, with Slide Mounts Feeder No Computer/Software Required
As someone who values preserving cherished memories, I find the DIGITNOW! 135 Film Negative Scanner to be an outstanding solution for anyone looking to convert their physical film and slides into digital formats. This product speaks directly to those of us who have old photographs stored away, gathering dust, and yearning for a way to relive those moments in a modern format. With its ability to convert 35mm film and slides to digital JPEGs, this scanner opens up a world of possibilities for sharing and preserving memories.
One of the standout features of this scanner is its adjustable rapid slide feeder. This is particularly beneficial for those of us who may have a large collection of slides or negatives. Instead of painstakingly scanning each photo individually, the feeder allows for a quicker, more efficient digitization process. I can imagine the joy of quickly converting a box of slides into digital files, ready to be shared with family and friends. The fact that it requires no computer or software makes it incredibly user-friendly, allowing me to dive right into the scanning process without the need for any technical setup.
The scanner operates with a high resolution of 1800 DPI, which is impressive for a product in this category. This level of detail ensures that my digitized images will retain their clarity and quality. The option to save these images directly onto an SD card (up to 32GB SDHC) or my computer means that I can easily manage and organize my photos. After digitizing, the JPG files can be copied, moved, or duplicated with just a click of a mouse. This flexibility in managing digital files is something I truly appreciate, as it allows me to create backups and share my favorites effortlessly.
Additionally, the DIGITNOW! scanner is equipped with a 2.4-inch TFT LCD screen. This feature allows me to preview the images as I scan them, ensuring I can make adjustments if necessary. The screen resolution of 480×234 provides a decent display for checking the quality of the scanned images. I find it incredibly convenient to make these adjustments directly on the device, rather than needing to connect to a computer every time I want to check my work. The inclusion of a USB 2.0 interface and a video cable that supports both NTSC and PAL formats makes this device versatile for various uses, whether for personal enjoyment or sharing on a larger screen.
The DIGITNOW! 135 Film Negative Scanner is compatible with various operating systems, including Windows XP, VISTA, 7, 8, 10, and Mac OS. This broad compatibility ensures that I can use the scanner regardless of my computer setup, making it a practical choice for anyone in my situation. The combination of ease of use, high-resolution output, and flexible file management makes it a compelling option for those looking to breathe new life into their old memories.
if you have a collection of film or slides lying around, the DIGITNOW! 135 Film Negative Scanner is a worthwhile investment. It not only simplifies the process of digitization but also enhances the accessibility of your treasured memories. I wholeheartedly recommend this product for anyone looking to preserve their past in a modern format. Don’t miss the opportunity to keep your memories alive—take the step to digitize them today!
Feature Description Slide Feeder Adjustable rapid slide feeder for efficient scanning. High Resolution 1800 DPI for clear, high-quality digital images. Storage Options Save scans directly to SD card (up to 32GB) or computer. Display Screen 2.4-inch TFT LCD screen for easy image preview and adjustments. Compatibility Works with Windows XP, VISTA, 7, 8, 10, and Mac OS.
Get It From Amazon Now: Check Price on Amazon & FREE Returns
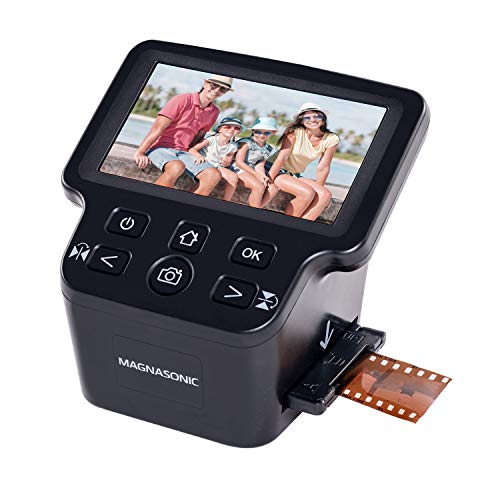
4. Magnasonic All-in-One 24MP Film Scanner with Large 5″ Display & HDMI, Converts 35mm/126/110/Super 8 Film & 135/126/110 Slides into Digital Photos, Built-in Memory (FS71)
I recently came across the Magnasonic All-in-One 24MP Film Scanner, and I must say, it’s a remarkable product that has the potential to change the way we preserve our cherished memories. With the rapid advancement of technology, it’s essential to keep our old photos and films from fading into obscurity. This scanner offers a user-friendly solution to convert various types of film negatives and slides into high-resolution digital JPEG files, making it an invaluable tool for anyone who wants to safeguard their past.
One of the standout features of the Magnasonic scanner is its ability to quickly and easily convert 35mm, 110, 126, and Super 8 film negatives, along with 135, 126, and 110 slides. With a stunning resolution of 24MP, the quality of the scanned images is impressive. I can’t stress enough how vital it is to preserve old memories in such high quality. Whether it’s a family gathering, a vacation, or a special occasion, being able to revisit those moments in vivid detail is something that everyone would cherish.
The large 5” LCD display is another fantastic feature. It allows you to view your film, slides, and scanned images directly on the scanner. This immediate feedback can be incredibly satisfying as you scan through your memories. I particularly appreciate the option to use an HDMI cable to view the scanned images on a larger screen, like a TV or monitor. It transforms the experience into a nostalgic journey, perfect for sharing with family and friends during gatherings.
Storage is often a concern with digital devices, but this scanner has you covered. It includes 128MB of internal memory and an SD card slot that supports up to 128GB of expandable memory. This means you can scan and save a lifetime of photos without worrying about running out of space. Knowing that I can easily store so many precious memories is a relief, especially when I think about how many old films and slides I have tucked away in boxes.
One of the most appealing aspects of this scanner is that no computer is needed for operation. This makes it incredibly accessible to everyone, regardless of their tech-savvy level. There’s no need for complicated or expensive photo-editing software or driver installations. I found it refreshing that I could adjust brightness, RGB color correction, and even flip or mirror images directly on the device. This feature makes the scanning process even more convenient and enjoyable.
Lastly, the fast and easy scanning process is a game changer. With a simple setup that allows for frustration-free operation, I was able to scan photos in less than five seconds each using the included fast-loading film trays. This efficiency means I can quickly digitize my entire collection without dedicating an entire weekend to the task. It’s perfect for busy individuals like myself who want to get the job done without sacrificing quality.
the Magnasonic All-in-One 24MP Film Scanner is an excellent investment for anyone looking to preserve their photographic history. It combines quality, convenience, and ease of use, making it a must-have for those with old films and slides gathering dust. I genuinely believe that this scanner can help individuals reconnect with their past in a tangible way. If you’ve been contemplating digitizing your memories, I wholeheartedly encourage you to consider this product. It’s time to bring those old images back to life!
Feature Description Resolution 24MP high-resolution digital JPEG files Display 5” LCD screen for direct viewing Memory 128MB internal memory + SD card slot (up to 128GB) Computer Requirement No computer needed; operates standalone Scanning Speed Scans images in less than 5 seconds
Get It From Amazon Now: Check Price on Amazon & FREE Returns
Why Converting Negatives Into Digital Images Helps Me
As someone who has always cherished my old photographs, I find that converting negatives into digital images is a game-changer. First and foremost, it allows me to preserve precious memories that might otherwise fade over time. The physical degradation of negatives can lead to irretrievable moments from my past, but digitizing them ensures that I have a lasting record that I can easily access and share with family and friends.
Moreover, the process of converting negatives to digital format opens up a world of creative possibilities. I can edit and enhance the images using modern software, bringing new life to old photos. This has not only rekindled my passion for photography but also allowed me to create personalized gifts, like photo books or prints, that carry emotional significance for my loved ones. Being able to manipulate these images lets me express my creativity in ways that were not possible with the original negatives.
Lastly, having a digital archive of my photographs offers me peace of mind. I can back them up in multiple locations, ensuring that they are safe from loss or damage. Whether it’s a nostalgic trip down memory lane or sharing a moment from my childhood at a family gathering, converting negatives into digital images has enriched my life and
Buying Guide: Convert Negatives Into Digital Images
Understanding the Process
When I first decided to convert my film negatives into digital images, I was surprised by the variety of methods available. I quickly learned that the process involves scanning the negatives to create digital files that I could easily edit and share. My goal was to preserve memories while making them accessible on my devices.
Choosing the Right Method
I explored several methods for converting my negatives. I considered options like dedicated film scanners, flatbed scanners, and even smartphone apps. Each method has its pros and cons, and I realized that my choice would depend on my budget, the quality I desired, and how many negatives I planned to convert.
Assessing Quality
Quality was a significant factor in my decision. I discovered that not all scanners are created equal. Some provided better resolution and color accuracy than others. I made sure to look for scanners that offered high DPI (dots per inch) settings to ensure I captured every detail of my negatives.
Budget Considerations
Setting a budget was essential for me. I found that prices for equipment varied greatly. While I considered investing in a high-end scanner for superior quality, I also discovered more affordable options that could meet my needs without breaking the bank. It was important for me to balance quality and cost.
Ease of Use
I wanted a user-friendly solution. When I researched different scanners, I paid close attention to their features and software. Some devices came with intuitive software that simplified the scanning process, which was a huge plus for me. I preferred equipment that didn’t require a steep learning curve.
Compatibility with Operating Systems
As I was preparing to digitize my negatives, I made sure to check the compatibility of the scanner with my operating system. I didn’t want to run into issues where I couldn’t use the scanner with my computer or laptop. This step saved me a lot of hassle down the line.
Storage Solutions
Once I had my negatives digitized, I needed to think about storage. I explored various options, such as external hard drives and cloud storage services. I wanted to ensure my digital images were safe and easily accessible whenever I needed them.
Editing and Organizing
After converting my negatives, I wanted to enhance and organize my images. I looked for editing software that would allow me to adjust colors, remove blemishes, and enhance clarity. Organization was also key, so I considered how to best categorize my images for easy retrieval in the future.
Final Thoughts
Converting negatives into digital images was a rewarding experience for me. By carefully considering my options and priorities, I was able to choose the right method that suited my needs. With my memories preserved in a digital format, I can now enjoy and share them with friends and family for years to come.
Author Profile

-
I'm Joseph Castle, an engineer, innovator, and lifelong advocate for sustainable development rooted in the high-altitude region of Ladakh, India. In the small village of Uleytokpo. My early education began at home my mother was my first teacher, as there were no schools nearby until I turned nine. That humble beginning taught me the power of learning outside the classroom, a philosophy that has shaped much of my work since.
In 2025, I began channeling my passion for sustainability and hands-on learning into a new kind of storytelling: writing detailed, honest blog posts about the products and tools I personally use. Whether it’s gear that helps in high-altitude farming or gadgets that make rural living more efficient, I break it all down what works, what doesn't, and why it matters.
Latest entries
- November 23, 2025Personal RecommendationsWhy I Switched to a 0 Gauge Amp Kit: My Expert Insights and Personal Experience
- November 23, 2025Personal RecommendationsWhy Upgrading My 01 Dodge Ram 2500 Headlights Transformed My Night Driving Experience
- November 23, 2025Personal RecommendationsWhy Upgrading My 2002 Chevy Impala Headlights Transformed My Night Driving Experience: An Expert’s Insight
- November 23, 2025Personal RecommendationsWhy Upgrading My 02 Chevy Silverado 1500 Headlights Transformed My Night Driving Experience